Hands-on Guide to Building LLM Apps in Java with Langchain4j and Qdrant DB


In this blog, we will explore how to build a Retrieval Augmented Generation (RAG) chatbot in Java. To construct this application, we will utilize the LangChain4j Java library. The goal of LangChain4j is to simplify the integration of AI/LLM capabilities into Java applications. LangChain4j was developed to address the lack of Java counterparts to the numerous Python and JavaScript LLM libraries and frameworks, recognizing that many enterprise application stacks currently rely on Java rather than Python. This ensures that Java developers have a viable solution for integrating AI/LLM capabilities into their applications.
This application is divided into frontend and backend; the frontend is built in React, and the backend is constructed in Java. The backend exposes a chat API, which the frontend calls to answer the user's questions. The backend of the web application is built using the Spring Boot framework, and I have employed Qdrant DB as a vector store for this application. In this blog, we will be focusing mainly on the backend components and delve deeper into the code.
Adding LangChain4j, OpenAI, and Qdrant Dependencies
First, we will create a Spring Boot web app and add the following Maven LangChain4j dependencies to the pom.xml file:
<dependency>
    <groupId>dev.langchain4j</groupId>
    <artifactId>langchain4j</artifactId>
    <version>0.26.1</version>
</dependency>
<dependency>
    <groupId>dev.langchain4j</groupId>
    <artifactId>langchain4j-open-ai</artifactId>
    <version>0.26.1</version>
</dependency>
<dependency>
    <groupId>dev.langchain4j</groupId>
    <artifactId>langchain4j-qdrant</artifactId>
    <version>0.26.1</version>
</dependency>
Creating Qdrant Collection
To store data in Qdrant DB, it is necessary to create a collection first. In this section, we will learn how to create the collection in Java using the Qdrant library. Initially, we will need to create a Qdrant client, which will assist us in authenticating and interacting with the Qdrant DB. The Qdrant quickstart guide provides instructions on how to build the QdrantClient.
import static com.ragchatbot.services.ChatConstants.QDRANT_API_KEY;
import static com.ragchatbot.services.ChatConstants.QDRANT_GRPC_HOST;
import static com.ragchatbot.services.ChatConstants.QDRANT_GRPC_PORT;

import io.qdrant.client.QdrantClient;
import io.qdrant.client.QdrantGrpcClient;


private QdrantClient getQdrantClient() {
    return new QdrantClient(
        QdrantGrpcClient.newBuilder(
                QDRANT_GRPC_HOST,
                QDRANT_GRPC_PORT,
                true)
            .withApiKey(QDRANT_API_KEY)
            .build());
}
I am using Qdrant cloud where I have set up my Qdrant cluster and below is the description of the values that need to be passed when creating the client.
| Variables | Description |
| QDRANT_GRPC_HOST | Cloud cluster URL |
| QDRANT_GRPC_PORT | GRPC port 6334 |
| useTransportLayerSecurity | Set this value as true |
| QDRANT_API_KEY | The API key which is generated when setting up the cluster. |
You can follow this document to create a free tier Qdrant cluster and play around with it.
The following method is used to create the new Qdrant collection.
import io.qdrant.client.grpc.Collections.Distance;
import io.qdrant.client.grpc.Collections.VectorParams;
import java.util.concurrent.ExecutionException;


String COLLECTION_NAME = "world_history_collection";
Integer OPENAI_EMBEDDING_SIZE = 1536;

private void createCollection() {
  val client = getQdrantClient();
  try {
    client.createCollectionAsync(COLLECTION_NAME,
        VectorParams.newBuilder()
          .setDistance(Distance.Dot)
          .setSize(OPENAI_EMBEDDING_SIZE)
          .build()
    ).get();
  } catch (InterruptedException | ExecutionException e) {
    throw new RuntimeException(e);
  }
}
OPENAI_EMBEDDING_SIZE is the embedding dimension size and COLLECTION_NAME variable contains the name of the Qdrant collection. In our example, the collection is named world_history_collection since we are storing world history information in this collection.
Inserting Data in Collection
Initially, we read data from the file through the getFileContent method. The data contains the text from the first chapter of the book "World History Since 1500." It includes information about the various empires worldwide during that period, as well as details about wars and discoveries in that era.
Subsequently, we divide the document and transform it into a list of TextSegment. This TextSegment list is then converted into an Embedding list. Following this, both the lists of TextSegment and Embedding are added to the Vector DB.
For writing the data to the vector store, the QdrantEmbeddingStore object is utilized. QdrantEmbeddingStore is like an interface that allows you to connect to the Qdrant collection using a specific GRPC host, port, and API key. This interface provides us with different methods that allow us to perform different operations like inserting and searching the vector DB. Further details on connecting to Qdrant with LangChain4j can be found in the accompanying documentation.
import dev.langchain4j.data.document.Document;
import dev.langchain4j.data.document.DocumentSplitter;
import dev.langchain4j.data.document.Metadata;
import dev.langchain4j.data.document.splitter.DocumentSplitters;
import dev.langchain4j.data.embedding.Embedding;
import dev.langchain4j.data.segment.TextSegment;
import dev.langchain4j.model.embedding.EmbeddingModel;
import dev.langchain4j.model.openai.OpenAiEmbeddingModel;
import dev.langchain4j.model.output.Response;
import dev.langchain4j.store.embedding.EmbeddingStore;
import dev.langchain4j.store.embedding.qdrant.QdrantEmbeddingStore;
import io.qdrant.client.QdrantClient;
import io.qdrant.client.QdrantGrpcClient;
import io.qdrant.client.grpc.Collections.Distance;
import io.qdrant.client.grpc.Collections.VectorParams;
import java.io.File;
import java.io.IOException;
import java.nio.file.Files;
import java.util.List;
import java.util.concurrent.ExecutionException;
import lombok.val;
import org.springframework.core.io.ClassPathResource;
import org.springframework.core.io.Resource;
import org.springframework.stereotype.Component;

@Component
public class DataIngestionService {

  public void setupRagChatbot() {
    insertDocuments();
  }

  private QdrantClient getQdrantClient() {
    return new QdrantClient(
        QdrantGrpcClient.newBuilder(
                ChatConstants.QDRANT_GRPC_HOST,
                ChatConstants.QDRANT_GRPC_PORT,
                true)
            .withApiKey(ChatConstants.QDRANT_API_KEY)
            .build());
  }

  private void createCollection() {
    val client = getQdrantClient();
    try {
      client.createCollectionAsync(ChatConstants.COLLECTION_NAME,
          VectorParams.newBuilder().setDistance(Distance.Dot).setSize(
              ChatConstants.OPENAI_EMBEDDING_SIZE).build()).get();
    } catch (InterruptedException | ExecutionException e) {
      throw new RuntimeException(e);
    }
  }

  private void insertDocuments() {
    EmbeddingModel embeddingModel = getEmbeddingModel();
    DocumentSplitter documentSplitter = DocumentSplitters.recursive(1000, 150);
    String fileContent = getFileContent();
    Document doc = Document.from(fileContent, Metadata.from("document-type", "history-document"));

    EmbeddingStore<TextSegment> embeddingStore = getEmbeddingStore();
    List<TextSegment> segments = documentSplitter.split(doc);
    Response<List<Embedding>> embeddingResponse = embeddingModel.embedAll(segments);
    List<Embedding> embeddings = embeddingResponse.content();
    embeddingStore.addAll(embeddings, segments);
  }

  private EmbeddingModel getEmbeddingModel() {
    String openaiApiKey = System.getenv("OPENAI_API_KEY");
    return OpenAiEmbeddingModel.withApiKey(openaiApiKey);
  }

  private static EmbeddingStore<TextSegment> getEmbeddingStore() {
    return QdrantEmbeddingStore.builder()
        .collectionName(ChatConstants.COLLECTION_NAME)
        .host(ChatConstants.QDRANT_GRPC_HOST)
        .port(ChatConstants.QDRANT_GRPC_PORT)
        .apiKey(ChatConstants.QDRANT_API_KEY)
        .useTls(true)
        .build();
  }

  /**
   * Read the data from the file
   */
  private String getFileContent() {
    Resource companyDataResource = new ClassPathResource("data/data.txt");
    try {
      File file = companyDataResource.getFile();
      String content = new String(Files.readAllBytes(file.toPath()));
      return content;
    } catch (IOException e) {
      throw new RuntimeException(e);
    }
  }
 }
Building a Basic RAG Chatbot
The inserted data can now be queried using BasicRagService class which is a question-answering agent with memory that can fetch relevant vectors from a vector store and pass it to an LLM to craft a cohesive, human-like response.
The purpose of the basicQuestionAnsweringAgent method is to build an AI service agent. The AiServices abstract class allows defining custom APIs through interfaces, which the library implements, thus simplifying interaction with AI models. Like, in this case, we have defined a custom interface called QuestionAnsweringAgent which is used to invoke DefaultAiServices.
To the AiServiceContext we have also added the ChatLanguageModel, RetrievalAugmentor which is the Qdrant ContentRetriever and MessageWindowChatMemory. The method body of getChatModel() and getEmbeddingStoreContentRetriever() can be found in the RagService class defined below.
import com.ragchatbot.models.QuestionAnsweringAgent;
import com.ragchatbot.dtos.ChatRequest;
import dev.langchain4j.memory.ChatMemory;
import dev.langchain4j.memory.chat.MessageWindowChatMemory;
import dev.langchain4j.model.chat.ChatLanguageModel;
import dev.langchain4j.rag.content.retriever.ContentRetriever;
import dev.langchain4j.service.AiServices;
import jakarta.annotation.PostConstruct;
import org.springframework.stereotype.Component;


@Component
public class BasicRagService extends RagService {
  QuestionAnsweringAgent agent;

  @PostConstruct
  public void init() {
    agent = basicQuestionAnsweringAgent();
  }

  /**
   * The answer method of QuestionAnsweringAgent is called which internally
   * calls the invoke method in DefaultAiServices class.
   */
  public String generateAnswer(ChatRequest chatRequest) {
    if (chatRequest.isNewChatThread()) {
      agent = basicQuestionAnsweringAgent();
    }
    return agent.answer(chatRequest.getUserMsg());
  }

  private QuestionAnsweringAgent basicQuestionAnsweringAgent() {
    ChatLanguageModel chatModel = getChatModel();

    // Chat memory to remember previous interactions
    ChatMemory chatMemory = MessageWindowChatMemory.withMaxMessages(10);

    // The content retriever is responsible for retrieving relevant content
    // from Vector DB based on a user query.
    ContentRetriever contentRetriever = getEmbeddingStoreContentRetriever();

    return AiServices.builder(QuestionAnsweringAgent.class)
        .chatLanguageModel(chatModel)
        .contentRetriever(contentRetriever)
        .chatMemory(chatMemory)
        .build();
  }
}
The common code is extracted and put in RagService. The method getEmbeddingStoreContentRetriever is responsible for building the Qdrant ContentRetriever.
import static com.ragchatbot.services.ChatConstants.COLLECTION_NAME;
import static com.ragchatbot.services.ChatConstants.OPENAI_API_KEY;
import static com.ragchatbot.services.ChatConstants.QDRANT_API_KEY;
import static com.ragchatbot.services.ChatConstants.QDRANT_GRPC_HOST;
import static com.ragchatbot.services.ChatConstants.QDRANT_GRPC_PORT;
import static dev.langchain4j.model.openai.OpenAiChatModelName.GPT_3_5_TURBO;

import dev.langchain4j.data.segment.TextSegment;
import dev.langchain4j.model.chat.ChatLanguageModel;
import dev.langchain4j.model.embedding.EmbeddingModel;
import dev.langchain4j.model.openai.OpenAiChatModel;
import dev.langchain4j.model.openai.OpenAiEmbeddingModel;
import dev.langchain4j.rag.content.retriever.ContentRetriever;
import dev.langchain4j.rag.content.retriever.EmbeddingStoreContentRetriever;
import dev.langchain4j.store.embedding.EmbeddingStore;
import dev.langchain4j.store.embedding.qdrant.QdrantEmbeddingStore;


public class RagService {
  protected ContentRetriever getEmbeddingStoreContentRetriever() {
    EmbeddingStore<TextSegment> embeddingStore =
        QdrantEmbeddingStore.builder()
            .collectionName(COLLECTION_NAME)
            .host(QDRANT_GRPC_HOST)
            .port(QDRANT_GRPC_PORT)
            .apiKey(QDRANT_API_KEY)
            .useTls(true)
            .build();

    EmbeddingModel embeddingModel =
              OpenAiEmbeddingModel.withApiKey(OPENAI_API_KEY);

    return EmbeddingStoreContentRetriever.builder()
        .embeddingStore(embeddingStore)
        .embeddingModel(embeddingModel)
        .maxResults(2)
        .minScore(0.6)
        .build();
  }

  protected ChatLanguageModel getChatModel() {
    return OpenAiChatModel.builder()
        .apiKey(OPENAI_API_KEY)
        .modelName(GPT_3_5_TURBO)
        .build();
  }
}
One major drawback of the basic RAG chatbot is the inability to use custom prompts. A prompt is used by the LLM model to produce the right output. The prompt helps the chatbot retrieve the most relevant context from the data source, which is then used in the generation step to generate a cohesive, human-like response. The issue of custom prompt is addressed in the advanced RAG chatbot.
Building an Advanced RAG Chatbot
We learned that the basic RAG chatbot does not give us the flexibility to use our custom prompt and, to solve this, we have built an advanced RAG chatbot where a custom prompt can be injected before requesting the LLM.
In the advancedQuestionAnsweringAgent() method, the first few lines are the same as before where we have initialized the LLM model, the chat memory, and the Qdrant content retriever. Next, we have introduced the PromptTemplate which instructs the LLM to use the retrieved contents to answer the user question. DefaultRetrievalAugmentor is responsible for augmenting the UserMessage with relevant content before sending it to the LLM. We have set the Qdrant content retriever and the content injector to the RetrievalAugmentor to retrieve documents from the DB and add the custom prompt.
import com.ragchatbot.models.QuestionAnsweringAgent;
import com.ragchatbot.dtos.ChatRequest;
import dev.langchain4j.memory.ChatMemory;
import dev.langchain4j.memory.chat.MessageWindowChatMemory;
import dev.langchain4j.model.chat.ChatLanguageModel;
import dev.langchain4j.model.input.PromptTemplate;
import dev.langchain4j.rag.DefaultRetrievalAugmentor;
import dev.langchain4j.rag.RetrievalAugmentor;
import dev.langchain4j.rag.content.injector.ContentInjector;
import dev.langchain4j.rag.content.injector.DefaultContentInjector;
import dev.langchain4j.rag.content.retriever.ContentRetriever;
import dev.langchain4j.service.AiServices;
import jakarta.annotation.PostConstruct;
import org.springframework.stereotype.Component;


@Component
public class AdvancedRagService extends RagService {

  QuestionAnsweringAgent agent;

  @PostConstruct
  public void init() {
    agent = advancedQuestionAnsweringAgent();
  }

  public String generateAnswer(ChatRequest chatRequest) {
    if (chatRequest.isNewChatThread()) {
      agent = advancedQuestionAnsweringAgent();
    }
    return agent.answer(chatRequest.getUserMsg());
  }

  private QuestionAnsweringAgent advancedQuestionAnsweringAgent() {
    ChatLanguageModel chatModel = getChatModel();

    // Chat memory to remember previous interactions
    ChatMemory chatMemory = MessageWindowChatMemory.withMaxMessages(10);

    ContentRetriever contentRetriever = getEmbeddingStoreContentRetriever();

    PromptTemplate promptTemplate = PromptTemplate.from(
        "You are a question answering bot. You will be given a QUESTION and a set of paragraphs in the CONTENT section. You need to answer the question using the text present in the CONTENT section."
        + "If the answer is not present in the CONTENT text then reply: `I don't have answer of this question` \n"
        + "CONTENT: " + "{{contents}}" + "\n" + "QUESTION: " + "{{userMessage}}" + "\n");

    ContentInjector contentInjector = DefaultContentInjector.builder()
         .promptTemplate(promptTemplate)
        .build();

    RetrievalAugmentor retrievalAugmentor =
      DefaultRetrievalAugmentor.builder()
        .contentRetriever(contentRetriever)
        .contentInjector(contentInjector)
        .build();

    return AiServices.builder(QuestionAnsweringAgent.class)
        .chatLanguageModel(chatModel)
        .retrievalAugmentor(retrievalAugmentor)
        .chatMemory(chatMemory)
        .build();
  }
}
APIs to Access RAG Chatbot
We have defined a Spring Boot RestController class ChatController which provides API to access the RAG services and insert data in the vector store.
| Endpoint | HTTP Method | Description |
| /chat | POST | Endpoint to access RAG services. |
| /chat/setup | POST | Endpoint that reads content from the data file and inserts into Qdrant DB. |
These endpoints can be tested via Postman before integrating with the frontend. Postman is a versatile API testing tool that simplifies the process of designing, testing, and documenting APIs. With an intuitive user interface, it allows developers to send HTTP requests, analyze responses, and debug efficiently. Postman supports a variety of request types, authentication methods, and data formats, making it an essential tool for streamlining the API testing process and ensuring the robustness of web services.
@RestController
@RequestMapping("/chat")
public class ChatController {

  @Autowired
  ChatService chatService;

  @Autowired
  DataIngestionService dataIngestionService;

  @PostMapping
  @CrossOrigin(origins = "http://localhost:3000")
  public ChatResponse processMsg(@RequestBody ChatRequest chatRequest) {
    var aiMessage = chatService.rag(chatRequest);
    var response = ChatResponse.builder().aiMsg(aiMessage).build();
    return response;
  }

  @GetMapping
  public String welcome() {
    return "Welcome to Chat Bot";
  }

  @PostMapping("/setup")
  public void processMsg() {
    dataIngestionService.setupRagChatbot();
  }
}
Calling the chat endpoint via Postman.
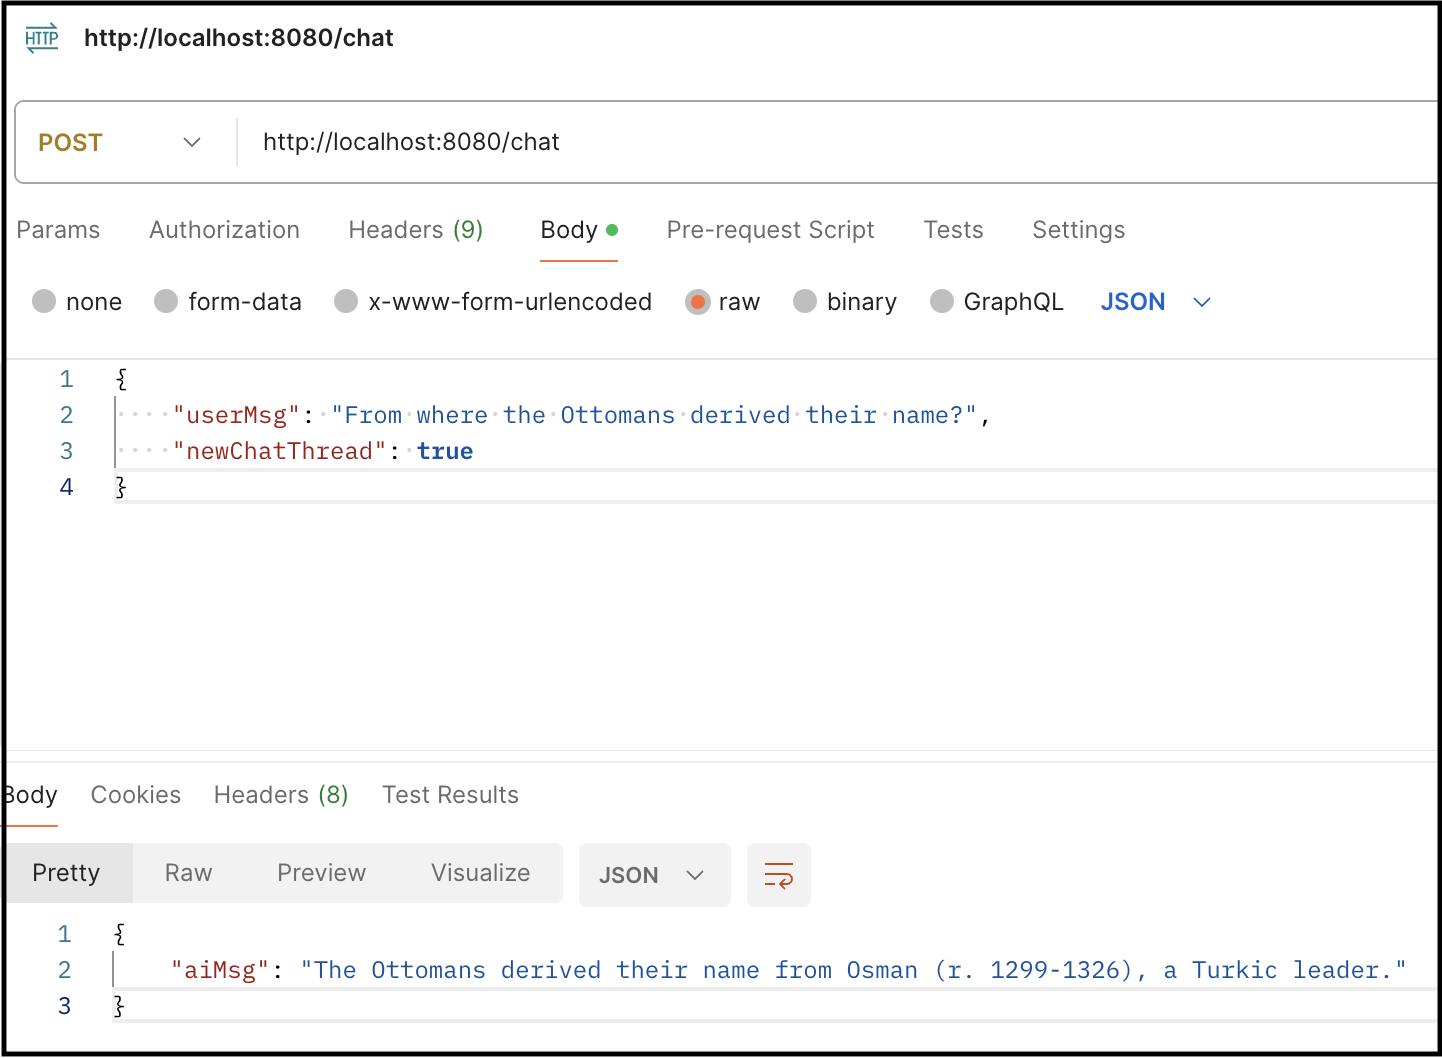
ChatRequest DTO is the payload of the chat endpoint.
@Data
public class ChatRequest {
  private String userMsg;
  private boolean newChatThread;
}
The ChatService class is a router class containing the selection logic to call either BasicRagService or AdvancedRagService. Right now we have kept it simple and just called the AdvancedRagService.
@Component
public class ChatService {

  @Autowired
  BasicRagService basicRagService;

  @Autowired
  AdvancedRagService advancedRagService;

  public String rag(ChatRequest chatRequest) {
    return advancedRagService.generateAnswer(chatRequest);
  }
}
Chatbot in Action
The final step is to call the backend chat API designed above from the React frontend application.

In conclusion, this blog has provided a comprehensive guide to building LLM applications in Java using the LangChain4j Java library. We explored the process of creating a Spring Boot project and incorporating essential dependencies such as LangChain4j, OpenAI, and Qdrant DB. With a detailed walkthrough, we learned how to create a Qdrant collection using Java code and efficiently insert data into it. The blog further delved into the construction of a basic RAG chatbot and advanced RAG chatbot, addressing key considerations and overcoming limitations. By following these steps, developers can now integrate LLMs into Java applications, and build apps across various domains, including customer service, healthcare, creative writing, and the financial sector. The java backend code is available in Github.
If you have any questions regarding the topic, please don't hesitate to ask in the comment section. I will be more than happy to address them. I regularly create similar content on Langchain, LLM, and AI topics. If you'd like to receive more articles like this, consider subscribing to my blog.
If you're in the Langchain space or LLM domain, let's connect on Linkedin! I'd love to stay connected and continue the conversation. Reach me at: linkedin.com/in/ritobrotoseth